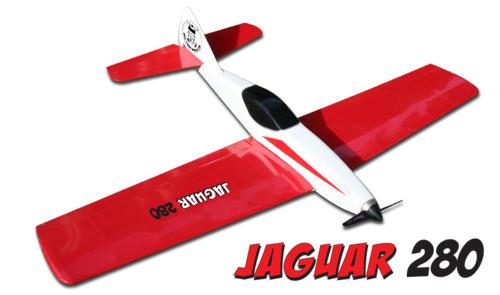
Rewiev: To build your Jaguar 280, you will need some tools: a cutter, a needle nose pliers, a sanding wedge with fine and medium grain sandpaper, a drill with some forests.It is also necessary a construction site (board perfectly flat wood not too hard) at least 15 cm x 40 cm and some pins with glass head.
We recommend using cyano to make all the collages so as not to weigh down the model unnecessarily.
— Start by locating the parts in relation to the plane. Spread it on a construction site in soft wood in which will be planted pins.
Fuselage
— Glue the sidewall reinforcements F2 on the flanks F1.
— Stick the F3 corner rods around the fuselage.
— With falling chopsticks, cut and glue a few cross members the width of the fuselage so as to spread the flanks compared to the view on it.
— Pinch the rear of the fuselage and then install the lower and upper formwork, only from the rear to the vertical of the leading edge.
— Pinch the front of the fuselage and glue the engine support torque.
— The fuselage can then be sealed everywhere.
— Use a sanding block to round off the corners, except at the seat of the stab.
Wing
— Check the trailing edge by 2 mm to slip the nervures and pin it to the plane.
— Place the lower beam of each half-wing on the plane and slide in the nervures.
— Place the upper spar on the nervures.
— Paste the leading edge.
— Cut the central nervure according to the size of the fin servo. Do not forget to also deduce the thickness of the wing key.
— Cut the root nervures flush with the spar to slide the wing key.
— Glue the two half-wings on the central nervure by inserting the wing key. To respect the dihedral, place a shim of 12 mm under the end nervures.
— Glue the salmon.
— Round off the leading edge and profile the salmon.
— Cut and bevel the fins.
— Make the torsion bars with a piece of sheath 4 cm in which passes a 9 cm long piano wire. Bend one end to 12 mm, 90 ° horizontally. Then fold the other end 45 mm from the elbow made, but at 90 ° vertemen this time. The other will be done symmetrically.
— Glue this assembly to the center of the wing after milling the trailing edge to the diameter of the tube.
Empennages
— Round off the edge of the control surfaces and bevel the depther flap to allow travel. Glue the horn on the shutter.
Finish
Tie the model to your liking.
— Drill the fuselage from side to side in order to slide the trunnions used to hold the elastic bands of the wing.
— Glue the stabilizer horizontally, leaving the air in place to serve as a visual cue.
— Remove the stabilizer at the level of the drift then stick it vertically.
Radio and motor equipment
— Drill the rear of the fuselage to slide the control sheath.
— Carry a bayonet on the servo side, slide the piano wire from the inside of the fuselage and bend it at the level of the depth control horn. — Fasten the servo to the double-sided making sure that the depth flap is in neutral.
— Immobilize the aileron servo in the center of the wing and make the piano wire commands. They will be folded bayonet side servo and tied loop side torsion bar. Two small tubes placed on each side will immobilize them.
— Solder the inverter to the motor terminals, without forgetting the noise filters.
Settings
— Position the battery pack so as to respect the center of gravity located in the middle of the spar and immobilize it with Velcro for example.
— Adjust the control surfaces so that the depth debates 4 mm on each side and the fins 5 mm. These values can be agmentées according to the habits of each one.
— Fit the propeller on the motor shaft.
| Reference | Designation | Materials | Number of pieces |
| F1 | Flank | Balsa 20/10 | 2 |
| F2 | Flank reinforcement in 2 parts | Balsa 20/10 | 2 |
| F3 | Corner wand | Balsa 4 x 4 | 4 |
| F4 | Couple before | Plywood 20/10 | 1 |
| F5 | Formwork top / bottom | Balsa 20/10 | |
| A1 | spar | Balsa 3 x 5 | 4 |
| A2 | Leading edge | Balsa 5 x 5 | 2 |
| A3 | The trailing edge | Balsa 5 x 25 | 2 |
| A4 | Central nervure | Balsa 100/10 | 1 |
| AT 5 | Nervure N1 | Balsa 20/10 | 2 |
| A6 | Nervure N2 | Balsa 20/10 | 2 |
| A7 | Nervure N3 | Balsa 20/10 | 2 |
| AT 8 | Nervure N4 | Balsa 20/10 | 2 |
| A9 | Nervure N5 | Balsa 20/10 | 2 |
| A10 | Nervure N6 | Balsa 20/10 | 2 |
| A11 | Nervure N7 | Balsa 20/10 | 2 |
| AT 12 | Wing key | Counter / plated 20/10 | 1 |
| A13 | Salmon | Balsa 100/10 | 2 |
| E1 | Stabilizer | Balsa 20/10 | 1 |
| E2 | Depth panel | Balsa 20/10 | 1 |
| E3 | Ground horn | Plastic | 1 |
| E4 | Derivative | Balsa 20/10 | 1 |
| D1 | Linkage | Piano string 10/10 | |
| D2 | Control tube | Plastic sheath ø 2 | |
| D3 | Wing fixing spigot | Beech ø 3 | 2 |